Shooting done. Well, for now at least. Time to share what I've learned, but before that some disclaimers.
This blogpost will have a very different structure when compared to other blogposts. Whereas the other ones usually just focus on the movements themselves and not much else this one will have a nuclear bomb of knowledge about guns. The idea being that you could send this to someone who barely knows what end of a gun the bullet comes off and by the end of it that person will have at least a decent basic understanding of guns. It is long and extensive despite being basic because it's a really, really large topic. I just felt like it wouldn't be complete without it being like this. When I eventually translate everything to video format I will also make an abridged version that follows the more usual and simple structure.
This guide will use a lot of broad terms like "generally", "in general", "usually", "most", "sometimes", because there are exceptions to everything and I don't want some guy on my ear saying "Actually this obscure gun from 1966 doesn't match up your description therefore all you wrote is incorrect".
I am not a police or military guy, but I am parroting what those guys say as well as very well informed civilians and the sources for everything (that I am capable of remembering and finding again) will be at the end of this blogpost, unless it's something obvious like saying pistols are small, I don't think I need a source for that.
We will be using a lot of technical terms, if you find something that you don't understand and that isn't explained look it up on the internet otherwise we will be here all day.
This guide IS about real firearms, but we will also be talking about other things as well for reasons that will be explained later.
This guide will mostly focus on pistols but will also give some tips for long guns as well.
Now, finally, let's begin.
Shooting is pretty simple and easy to learn, at least for me, but it can be very expensive if you don't know how to train it efficiently as it takes a lot of repetition to get good at it. Fortunately, dry firing exists. It consists of training without using actual ammunition. You can use an empty firearm, a non firing replica like a blue gun, a firing replica like an airsoft gun and some other options that I will only briefly talk about due to not having experience with. Dry firing is also good because it lets you train at the convenience of your own home, thus making it easier for you to train and that brings more frequent training.
Let's take a look at our options for dry firing, from least expensive to most expensive. Additionally, for the purposes of simplifying things nearly all of the options allow you to train some elements of gun safety, handling and certain aspects of precision shooting, so none of this will be repeated.
Low end blue gun:
It will allow you to train draws, target acquisition/sight alignment, target transition and that's about it. It's very limited due to usually having non functioning triggers, safety, magazines and overall being just a piece of plastic shaped like a gun. Weight is usually very light and unrealistic. I would highly recommend giving it a pass and saving money for something else.
Spring airsoft gun:
It will allow you to train draws, target acquisition/sight alignment, (some) precision shooting, target transition, reloading, (some) malfunction resolution and (some) force on force. It won't let you train follow up shots due to requiring you to manually cycle it. It's precision is rather poor due to it's low FPS thus requiring lighter BBs, however, you could compensate this by making the targets smaller and getting closer to them. You can rack the slide so you could train some malfunction resolutions but they are usually very fragile so I would recommend against it. It's also not very good for force on force training as due to all it's disadvantages taking it to an airsoft field would probably result in you getting trashed throughout the entire game. Weight is usually very light and unrealistic as well. I would say this is the first viable option, if you are
really short on money but
really want to start getting some reps in, it's a reasonable choice, but I'd still recommend you to save some more money for something better.
Mid end blue gun:
It will allow you to train draws, target acquisition/sight alignment, target transition, reloading and malfunction resolution. You can train supporting skills fairly well but it's lacking on the main skills due to their inability to shoot. Weight is still too light and unrealistic. I would skip it if I were you, but maybe you could pair it up with an airsoft gun to mutually cover some of their flaws.
High end blue gun:
It will allow you to train draws, target acquisition/sight alignment, (some) precision shooting, target transition, reloading and malfunction resolution. It may seem like a pretty complete package until you consider that these ones usually fire a laser from it's barrel and that's what gives it some capacity to train precision shooting, problem is that after that laser is gone you no longer have a way to verify your hits on target and that's very detrimental to drills that require multiple shots. Weight is again too light and unrealistic. I'd skip it.
Electric airsoft gun:
It will allow you to train draws, target acquisition/sight alignment, precision shooting, target transition, (some) reloading and force on force. Electric airsoft guns usually have non reciprocating slides so you will be unable to train for malfunctions, their magazines sometimes are of a different, thinner shape than the ones of a real gun due to how their internals work, but you should be able to practice reloading regardless. Their weight is quite similar to the one of a real firearm, but still a little bit on the lighter side. This was my choice as it provides most of what I wanted while still being relatively cheap.
Gas blowback airsoft gun:
It will allow you to train draws, target acquisition/sight alignment, precision shooting, target transition, reloading, malfunction resolution, (some) recoil mitigation and force on force. The most notable thing about this one is the recoil, it's nice to be able to get a bit used to it but you have to keep in mind that it still doesn't come close to the recoil of a real firearm, still nice to have though. The weight is usually very close to the one of a real firearm. The price of the gun itself is usually very similar to an electric one, but the magazines are more expensive and they require gas to run instead of just BBs like electric ones so that extra cost will start to stack up because we will be firing thousands of rounds. The gas also makes them a bit louder. If I was a little more well off I would have bought one, I will probably sell the electric one in the future and upgrade to a GBB.
Empty firearm:
It will allow you to train draws, target acquisition/sight alignment, target transition, reloading and malfunction resolution. It's pretty much an overpriced mid end blue gun with the advantage of being an actual gun that if necessary you can actually use. The weight is obviously of a real firearm, it is one! For the pure purposes of training it isn't a good option as you could get most benefits of it with a mid end blue gun, however, you could upgrade it with the next option.
Empty firearm + laser firing device:
It will allow you to train draws, target acquisition/sight alignment, (some) precision shooting, target transition, reloading and malfunction resolution. Now it's pretty much an overpriced high end blue gun! Talk about diminishing returns. These laser firing devices often take the shape of a fake bullet that fires a laser when the striker hits a button where the primer would usually be, could also take the form of a part of the gun that fires a laser that replaces some other part. Weight is again the one of a real firearm. It is very nice to be able to train with your real gun but it still lacks the ability to train certain things that even an electric airsoft gun would. If you don't have a real firearm and you feel like you will need one soon while somehow only having the money for it, then sure go for it, but if you just need to train I'd say get something else.
Realistic training guns and conversion kits:
It will allow you to train draws, target acquisition/sight alignment, precision shooting, target transition, reloading, malfunction resolution, (some) recoil mitigation and force on force. These take the form of things like the UNIT4 training rifles or MTX training ammo that is fed on real firearms with conversion kits to run them. The recoil can get very, very close to the real thing on rifles but not so much for pistols. Keep in mind however that when it comes to force on force I don't think many airsoft fields would let you use what is essentially a paintball gun, but paintball fields maybe will. The weight is that of a real firearm. It's pretty much like a GBB airsoft gun but with additional recoil, precision and range. If you have lots of money and don't care about that addendum about airsoft then sure go for it. These two are grouped together because they are pretty similar on what they do, but dedicated training rifles are obviously cheaper than a real rifle running simunitions.
Now that you have chosen the general category of training gun you wish to use let's take a look at the more common categories of guns that training gun will represent. And remember, generally speaking the larger they get the more expensive they get.
The following is considering the use of regular ammunition unless stated the contrary. For more regular firearms that would be FMJ while for shotguns that would be buckshot. We will go into more detail on the topic of ballistics later on.
Pistols:
In general pistols are semi automatic, small, compact, easily concealable firearms meant for self defense that fire pistol caliber ammunition, in layman's terms a small bullet. They are good at close range and struggle with anything past that. They are usually unable to pierce soft body armor. Their ability to pierce materials is also rather low. In airsoft I'd recommend you to stick to fields or areas of fields that are focused on close range as airsoft guns are very limited in regards to range and most airsoft pistols are specially affected by this, therefore you will have a very bad day at longer engagement ranges. There are also machine pistols that are basically pistols but those have the capability to fire in fully automatic, full auto pistols are usually very difficult to control.
I highly, highly recommend you to choose a pistol as your initial training and learning platform. Why? Well, things that have a third point of contact with your body, usually a stock that goes up against the area of your chest that borders your shoulder, are much easier to shoot, but good rifle skills usually don't easily translate into good pistol skills. Pistol skills however, are easily transferred to other weapon systems. If you are capable of shooting well with a pistol you will easily learn how to shoot well with for example a rifle because you have gotten good at shooting with a platform that requires you to truly understand and be good at the fundamentals of shooting. Additionally, the characteristics of pistols are much more suited for the general focus of these series of guides and tutorials, that being stealth.
Revolvers:
In general revolvers are single, double or single and double action hybrids, small or somewhat small, compact or somewhat compact, easily or somewhat easily concealable firearms meant for self defense that fire pistol caliber ammunition or larger pistol caliber ammunition, in layman's terms a small bullet or a big small bullet. They are ok at close range and struggle with anything past that. They usually struggle to penetrate soft body armor. Their ability to pierce materials is the same as pistols for the smaller ones or a bit more than pistols for the larger ones. They may seem a lot like pistols until you consider they have a very small capacity when compared to most modern pistols, typically 5 to 8 rounds, 6 in most, compare this to the capacity of modern pistols that's usually at least 12 and you can see that revolvers are an obsolete weapon system. Also very slow to reload if you don't have a speed loader. If you do pick this and go to something like airsoft you will very quickly see how outclassed you are. All of this and they are usually less customizable than pistols. Just get a pistol bro.
Pistol caliber carbines:
In general pistol caliber carbines are semi automatic, sort of small, sort of compact, not so easily concealable firearms meant for self defense that fire pistol caliber ammunition. They excel at close range and do begin to struggle at anything past it but they have quite a bit more range than pistols due to having a stock and longer barrel. Their ability to penetrate armor is similar to pistols but a bit better, sometimes able to pierce soft body armor due to longer barrels that provide higher velocities. Their ability to penetrate materials is also pretty similar to pistols. In airsoft you can expect this to have the range of assault rifles as they are large enough to fit their internals, however, you will struggle to find a proper pistol caliber carbine as most things in airsoft that can be full auto will be full auto, but you can simulate it by only using semi auto, otherwise it's basically an SMG. Speaking of which.
Submachine guns:
A submachine gun is pretty much the same as a pistol caliber carbine but full auto and meant for assaulting positions at close range. I decided to make them separate categories as PCCs are usually operated by civilians while SMGs are usually operated by military and police. Or at least they used to be operated by them. You see, body armor kind of made them obsolete because they struggle to pierce them, they were then replaced by a similar weapon concept known as de Personal Defense Weapon. Once again speaking of which.
Personal defense weapons:
A PDW is pretty much a SMG but with some altered characteristics. It was born during the cold war when NATO feared soviet paratroopers falling behind their lines and wrecking havoc on rear echelon troops and logistics units, they wanted to equip those guys as well as tank crews with something portable but easier to use and with more range than a pistol that was also capable of piercing body armor that the paratroopers would probably be using, from this the PDW concept was born and gave us weapons such as the MP7 and P90. Although it has "defense" in it's name and was born out of a defensive need it is still functionally a SMG with better armor piercing capabilities and is not uncommonly used as such by police and sometimes military. However, their better armor piercing capabilities only manifest themselves when using armor piercing rounds that are usually only available to the police and military, without them it has almost the same armor piercing capabilities of a SMG or PCC. If you wish to easily and consistently be able to pierce soft body armor with regular commercially available ammunition I'd recommend taking a look at the next weapon category.
Semi auto rifles:
In general semi auto rifles are, well, obviously semi automatic, varied in size, compactness and concealability meant for many different purposes and fire intermediate caliber ammunition, in layman's terms, a medium bullet. They are good at close and medium ranges and will struggle past that. They are usually capable of piercing soft body armor. They are usually capable of piercing quite a lot of materials, but still not capable of piercing things like most brick or cinder block walls. As you can see, they vary a lot, that's because of the many different configurations they can be outfitted with. Being semi auto reflects their civilian nature, the AR15 is probably the most famous example of a semi auto rifle. They are also often referred to as "carbines". In airsoft, you will have the same problem and solution as with a PCC, that being of a lack of semi only rifles, so just take a select fire rifle and use it on semi only. Speaking of select fire.
Select fire rifles:
In general select fire rifles are pretty much the same thing as semi auto rifles but this time they allow you to choose between semi, full and sometimes burst fire modes. They are mostly only available for police and military in most countries. Riflemen are the bulk of combat troops in most armies as they are easy to learn and fair well in most situations infantry may encounter on a war. They are also often called "assault rifles" but the shorter ones are usually called "carbines" as well. If you don't want to train with a pistol this or their civilian counterparts the semi auto rifles are my second recommendation. In airsoft they will do well in as far as I know all fields.
Battle rifles:
In general battle rifles are semi or select fire, big, not compact, I'd say impossible to conceal on a person, meant to basically be chonkier assault rifles that fire full length rifle ammunition, in layman's terms, a big bullet. They are good at close and excel at medium ranges, with a bit more reach than most assault rifles. They are capable of piercing soft body armor. They can pierce through a lot of material, not a well built brick or concrete wall though. Since the mid cold war they have mostly been replaced by assault rifles, but some armies still keep them as their main rifles or in specific roles.
Designated marksman rifles:
In general DMRs are semi but also sometimes select fire, big or somewhat big, not compact, again I'd say impossible to conceal, meant to fill the engagement ranges that stand between standard assault or battle rifles and sniper rifles. Some fire intermediate caliber others full length. They are usable at close range but truly excel at medium to long ranges. Capable of piercing soft body armor. Material piercing capabilities dependent on caliber, bigger usually more material penetration. They are kind of like battle rifles but truly dedicated to longer ranges. In airsoft they do, well, what they were designed for in reality but with airsoft engagement ranges.
Sniper rifles:
In general sniper rifles are bolt action, big, not compact, once again impossible to conceal on a person, meant to pick off enemies, usually high value targets, at long distances. They fire full length rifle ammunition. Excel at long ranges, not recommended for shorter distances. They are capable of piercing soft armor and some can even pierce some plate armor. They can also pierce through a lot of material. In airsoft, once again it's a case of what they were made to do in reality but with airsoft's limitations on range. I would however recommend you to not use a sniper rifle as your starting airsoft weapon, but if you still want to, make sure not to buy the cheap ones as they are pretty bad. Airsoft sniping is usually good stealth practice though.
Anti material rifles:
In general AMRs are bolt action or semi, enormous, not compact would be an understatement, unconcealable as well, meant for taking out things such as explosives, engines, light vehicles, well, material, but can also be used against personnel as well. They fire... Actually I couldn't find the technical term for it so I'll just say the layman's that being a really BIG bullet. Excel at longer ranges. Are capable of piercing all but the heaviest body armor. Their name already indicates it's material piercing power, not even concrete block walls can withstand it. In airsoft they work pretty much as bulkier DMRs or sniper rifles.
Light machine guns:
In general LMGs are full auto, big, not compact, unconcealable, meant for squad support in activities of attack by suppressing enemies so others can flank them and in defense by holding down areas. Some fire intermediary calibers others fire full length. Usable at close range but excel at medium. Capable of piercing soft body armor. Material capabilities are dependent on caliber, the heavier ones pierce more material. They are mostly only available for the military. In airsoft they operate in a similar manner as reality due to generally being bulky, heavy and reducing mobility.
Shotguns:
In general shotguns are break action, pump action, semi automatic or fully automatic, varied in size, compactness and concealability, usually meant for close range engagements, often in an offensive role. Excel at close range but aren't as limited in that regard as Call of Duty would have you believe. Aren't capable of piercing soft armor. Material piercing capabilities are good, drywall trembles upon the sight of them. Break action shotguns are obsolete for combat purposes at this point. In airsoft they tend to work like in reality, but again with airsoft's limitations.
Now that you have chosen the general category of gun you wish to train with, let's actually get over to training. Again, this guide is focused on pistols with some tips for long weapons, you will simply use your brain to adapt the contents of this guide for your particular gun and training gun.
Safety:
The first thing you have to train is gun safety. Let's go about the rules of gun safety.
First the four more common ones.
1. Always treat the gun as loaded.
2. Always keep your finger off the trigger until you are ready to fire.
3. Never point the gun at anything you don't intend to destroy.
4. Be sure of your target and what's beyond it.
Now additional rules that most people don't mention and are somewhat redundant or heavily affected by context but I still think should be kept in mind.
1. Always keep the gun pointed in a safe direction.
2. Always keep the gun unloaded until you are ready to use it.
3. Learn the mechanical and handling characteristics of the gun you are using.
4. Always use proper ammunition.
5. Be sure the barrel is clear of obstructions before loading and shooting.
6. If your gun fails to fire when the trigger is pulled, hold your shooting position for several seconds then with the muzzle pointed in a safe direction, carefully unload the gun.
7. Don't rely on the gun's safety to keep it from firing.
8. Be aware of your surroundings when handling guns so you don't trip or lose your balance and accidentally point and/or fire the gun at anyone or anything.
Of course, some of those things can be relaxed if you are using a training gun, but even then you should keep them in mind regardless.
If your weapon has a manual safety it is highly recommended to keep it on until you are ready to fire, it may be annoying at the start but with training this becomes way less inconvenient. You may say "but a lot of these rules are redundant!" and you would be right, it's meant to be this way, kind of like how planes have multiple redundancies to avoid accidents, it's the same here. If you forgot to activate the safety you kept your finger off the trigger, if you forgot that as well at least you were pointing the weapon at the ground instead of anyone or anything.
Another thing about safety that you must keep in mind is protective equipment. You only have one set of eyes and one set of ears, if they are lost they are lost forever. Use safety glasses, if short on money you can go to a hardware store and get them for cheap. This is relevant for both real firearms and airsoft, if a bullet hits something and fragments fly into your unprotected eyes it's over, same with airsoft, BB ricochets off a wall and goes into your eye it's also over. Wear ear protection, it's quite cheap but this time I'd recommend getting something specifically made with shooting in mind instead of something out of a hardware store. Shoot a real firearm without then and not so slowly but absolutely surely you will lose a good portion of your hearing, in airsoft some fields allow training grenades that explode with a loud boom, too many of those and the same thing will happen. Eye and ear damage is often irreversible, will you take that risk? No? Then use eye and ear protection. Additionally but not so critically when doing force on force with something like airsoft consider using some sort of protection for your mouth, the ammunition may be non lethal for you as a whole but they certainly can be lethal for your teeth. I encourage you to do your own research into eye, ear and mouth protection as there are many options out there.
Stance:
The second thing to work on is your stance as nearly everything else you do flows from it. In a real situation you won't always be able to get on a perfect stance but you should still train it as getting something close to a good stance helps a lot. You are also able to move your legs and get into stance once the situation develops to allow you to do so.
You may notice words like "about" in the following and other paragraphs. That's because everyone has different anatomy so what works for some may not work too well for others. Because of this I think some room should be left for adaptation and you should see certain things that I say more as guidelines. Other things however are very objective and you should strictly follow them.
It begins at your feet. You want to position them in a way that your feet are about aligned with your shoulders. Next you will put one of your foot, usually your non firing leg foot, so the foot opposite to the arm you hold the gun's grip or shoulder the gun with, about a step forwards. The firing leg can work too but I personally found it to feel weird and non intuitive. Obviously you could also put one foot back to achieve the same effect. Next it may have already happened on it's own but the back leg foot will be pointed a bit off to the side away from your body. A BIT off, not too much. Next you want to bend your knees a little to help with overall stability and recoil management. Next is your hips and torso. If you are or are going to be wearing body armor like a plate carrier for example you want to present your plates to the target, this means the plates are facing the target in the way that covers your vitals as much as possible, so you don't want to lean forwards or to the sides, instead you should keep your hips and torso centered with the target and your spine straight. Guys die because they lean forwards in an effort to cushion recoil or "have a more aggressive stance" and end up getting shot in an unarmored vital area that would otherwise be protected if they had used a proper stance. We will talk about the arms and hands portion of stance later, first we gotta reach the gun.
Draw:
Lets go over the drawing process in a simplified way. We will go over the intricacies of the steps later on. Drills and how to train these things will come after all the instructions.
To draw your weapon you must first clear the holster of any obstructions. If it's a concealed holster you must get your clothes out of the way. If it's an outside the waistband holster it may have some sort of mechanical lock to prevent someone from taking the gun away from you when you aren't paying attention. The mechanism may be loud so if you need to do it silently you must figure out what's causing the noise and prevent that from happening in some way. Maybe the button you press releases a spring that pushes whatever blocks the gun's path out of the way really quickly and when it hits something it makes a lot of noise. You can maybe add padding to it or simply hold the blocker when you press the button to ensure that it doesn't hit anything too quickly, that is obviously slow so keep that in mind. With the obstructions out of the way you must grip your gun, make sure it's a good grip as that grip will probably accompany you throughout the engagement. Next you want to pull the gun out of the holster and bring it towards the work zone through the fastest available route while simultaneously deactivating the weapon's manual safety if applicable and also bringing the off hand to the work zone. Next you want to form a two handed grip. Now you must drive the weapon towards your target while prepping the trigger and forming a sight picture. With that done fire the weapon if you deem it necessary.
Of course, that whole process may not be the best in every situation. For example in a scenario where someone is running at you with a knife at very close range you will probably be better off cutting the process to simply drawing the weapon and point shooting with one hand while moving away from the attacker and protecting your neck with your other arm. We will however only cover that longer method of draw as understanding it will give you the basis to figure out other methods by yourself.
The grip:
A good grip on a pistol will be done by holding the weapon as high as possible. "As possible" means without stopping the gun from functioning and without hurting yourself, that slide will reciprocate and you don't want your finger on it's way. To see what a good grip looks like simply do an L shape with your thumb and index finger and slide the corner of that L shape on the pistol's grip as high as the tang/beaver tail will allow you to. Next you want to wrap all your fingers around the the grip, remember to not put your index finger inside the trigger guard unless you want to fire the weapon. As for the strength to be applied to the grip you want to apply as much force as you can without having the sights shake or your trigger finger locking up and preventing you from firing. You want to point at something and have the barrel pointed at that thing as well, almost as if the pistol was a natural extension of your hand and arm. If you have followed these instructions correctly you should have formed a good one handed grip.
The concept of the working zone:
The working zone can be seen as a rectangular box shaped area that begins at the lower part of your chest and goes up to the height of your forehead. It's in this area that you will perform most of the activities related to managing your gun, such as forming a two handed grip, reloading and clearing malfunctions.
The two handed grip:
To form a two handed grip you must lift your firing hand's thumb to make space for the non firing hand. Next in a similar way to how you did an L shape and got under the pistol's tang/beaver tail you will take the non firing hand, make it as if you were going to high five someone but with your thumb sticking out and put your non firing hand's index finger under the trigger guard by about the middle of the finger. Next you want to put your non firing hand's fingers in the grooves of your firing hand's fingers all the way from your index finger to your pinky, the pinky will probably be left in direct contact with the pistol's grip. Next you will wrap the palm of your non firing hand around the exposed part of the pistol's grip. Now finally you will set your thumbs back down. The firing hand's thumb should be on top of the non firing hand, it's last section is now probably touching the first section of your other thumb. Your two handed grip should be done now.
The arms and hands portion of stance:
When lining up your shot you want to align your pistol's sights with your target and with your eyes, however, you want to bring the sights to your eyes not the other way around. Another thing to watch out for is to not fully extend your arms when aiming down the sights. You want a slight curve provided by slightly bending your elbows, this will help in the future when it comes to shooting while moving as that slight bend will help a lot with shock absorption and other things we will go about later. The last thing to note is that your pistol should be about aligned with the center vertical line of your body.
For long weapons, you will most likely have to move your eyes to your sights by slightly tilting your head. That's because the stock must be positioned in the outer area of your chest that borders your shoulder. You have to do that because, well, any other options will be sub optimal at best and very painful at worst. Putting the stock of a shotgun at the center or your chest or at your shoulder and firing the gun will ingrain this lesson in your brain in a way you will never forget.
Sight alignment:
When it comes to sight alignment we will be mostly talking about iron sights as red dots are extremely simple. Simply put the dot on top of your target and press the trigger without disturbing the dot and that's pretty much it. I mean, provided they are zeroed and I will not be talking about how to zero a red dot as there are guides out there that can do the job way better than I can. If your iron sights are adjustable then they also need to be zeroed, that is more of a rifle thing however, pistols rarely have adjustable iron sights.
The first thing you must do is find out what eye is your dominant eye, that is, the eye your brain gives preference to most of the times when both of your eyes can see the same thing. To do that simply take your hands and use your thumbs and index fingers to make a triangle shape. Next pick a point of some thing that's about 3 to 5 meters away. Now look at that point and put the triangle shape on top of the point in a way that the point is at the center of the shape. Now close one of your eyes. If the point is still at the center of the shape then the eye that is open is your dominant eye and the one that's closed is your non dominant eye. If the point is no longer at the center of the shape then the eye that is open is your non dominant eye and the one that's closed is your dominant eye. If your dominant hand is at the same side as your dominant eye you are regular eye dominant. If your dominant hand is not at the same side as your dominant eye you are cross eye dominant.
This is important because we want to shoot with both eyes open, it's too much of a disadvantage to lose half of your field of vision when shooting and because of that we must do as stated before and bring the sights to the eye but it has to be the correct eye, your dominant eye.
With pistols it's pretty easy to counter cross eye dominance, you will simply hold the pistol with your dominant hand and bring it to your dominant eye. Additionally you can also slightly turn your head to the gripping hand's direction in order to better centralize everything. Do not tilt the pistol to bring it to your dominant eye as that will make it not leveled and that makes recoil harder to control.
With long weapons on the other hand you will have some options, all of them with a bad side. You can use dominant hand and non dominant eye, but then you lose some visual acuity. You can use non dominant hand and dominant eye, but then you lose some ability to handle the weapon. You can use dominant hand and close the dominant eye when you're going to shoot but then you lose some field of view. I'd say use the first option for extremely close ranges and use the last option for longer engagements.
If you have cross eye dominance do not feel discouraged to learn shooting. I myself have cross eye dominance and I don't see it as much of a problem.
With that out of the way let's actually talk about sight alignment. It is often said a image is worth a 1000 words, I'd say even more words in this case, so we will be using images a lot in this section.

While shooting with both eyes open your sight picture should look something like this. It takes a while to get used to it so take your time.

You want to be able to consistently bring the sights to your eyes and already have them properly aligned or at the very least requiring minimal adjustment. It may be very hard at the start but with time and practice you'll get there.

Get the alignment wrong and you'll struggle to hit your targets.

You want to focus on your front sight. The target should be blurry. Front sight focus makes the entire process of aiming easier in many ways. Most pistols these days already come with some sort of dot in the front and rear sights, if yours doesn't have it you may want to put something in your sights like tape or paint as aiming in general can be quite difficult if you're trying to align black sights on a black target. Front sight focus can be difficult at first but again with time and practice you'll get better at it. Make sure you are actually focusing on the front sight and not merely looking at it.
Breathing control:
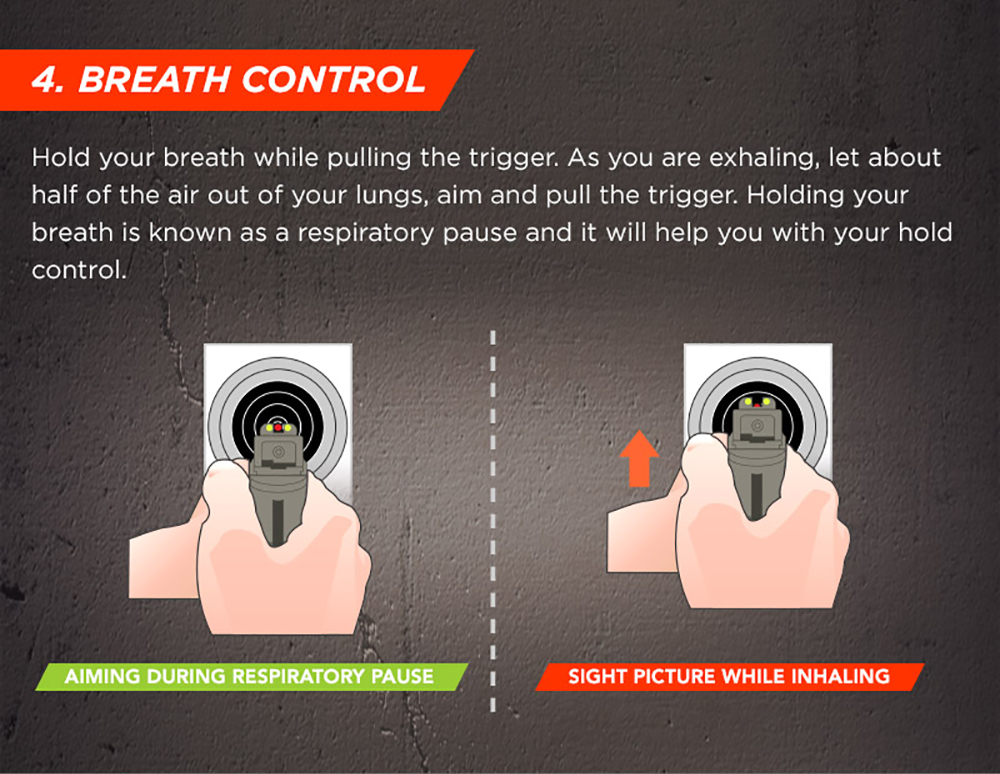
For very precise shots without much time pressure you might want to consider holding your breath for extra stability. In open combat however you want to breathe normally throughout your engagement as the extra few seconds you take to hold your breath can mean your enemy hitting you before you hit them. At the start of my training I'd hold my breath to compensate for my lack of skill in other areas, a few weeks later and I didn't even think about breathing.
Trigger management:

Additionally, when pulling the trigger you don't want to "yank" it back, you want to "prep" it. Prepping the trigger means pulling through the trigger's slack, that is, the soft and easy to pull part of the trigger, and reach "the wall". The wall is the part of the trigger where you find the most resistance, after that the weapon will usually fire. When shooting you want to fire from the wall as the opposite to it, just pulling the trigger all the way from the beginning will usually result in poor hits on target at best and total misses at worse due to how you will likely pull the entire pistol down and to the side. You should also avoid changes in how much strength you use on your grip when pulling the trigger as that can also affect your accuracy.
Recoil management:
When a gun fires, most of them will apply force backwards and upwards, that's what's called recoil. Your objective is to control recoil so that it's not as big of a problem as it could be. Fortunately for you the things you have learned in relation to stance and grip already help with that a lot, but you still have to learn how to actively mitigate recoil. After a gun fires the tip of it's barrel will go up, you want to force it back down on target as opposed to just let it fall back on target on it's own. A good way to visualize how that works would be playing a first person shooter game and the difference between pulling the mouse down while firing to keep the sights on target as opposed to just stop firing and letting the sights fall back onto the target to then fire again. The first option allows you to do follow up shots much faster. Additionally, recoil anticipation, so pulling the gun downwards right before firing, is simply missed timing of trying to do active recoil mitigation. In that case you want to train yourself to get the timing right as opposed to get rid of that instinct altogether.
Follow up shots:
Sometimes you may need to take multiple shots one after the other. What you DON'T want to do is fire the gun, handle the recoil, bring the sights back on target and only after that release the trigger, hear the "click" sound of the trigger mechanism resetting and because you heard that click firing another shot. What you DO want to do is to fire the weapon, handle the recoil, bring the sights back to the target and at the same time that you're doing all of that release the trigger to the point the mechanism resets and makes the gun ready to fire again, this means that ideally you never hear the click of the mechanism resetting. If you are incapable of doing in a way you don't hear the click, at the very least you must make sure you're not letting the click dictate when you fire your weapon, you must fire it when you need it to fire, not because you heard the click.
Target transition:
To get your sights from one target to another you will simply repeat the process of acquiring a sight picture to your first target, as in, look at your other target and then bring the sights to your eye. Ideally you have trained enough to the point that your sights are already aligned when brought to your eye. The opposite, to keep the sights aligned with your eye and bring both sights and eye to the next target is not recommended as you will likely pass the target with the sights anyway, also tends to be more sluggish. Additionally, if you are on a proper stance your feet should stay fixed on the ground and your knees, hips, torso, arms and head are the ones that move, unless the other target is beyond your turn radius of course, in that case you should obviously move what's needed to get to the target.
Reloading:
When the time to reload your weapon comes you will have three options, the regular reload, the tactical reload and the emergency reload. The regular reload is accomplished by first taking the spent magazine off the gun, putting it back on your kit, picking from your kit a fresh magazine, inserting the new magazine in the gun and finally racking the slide, bolt or whatever your gun has if necessary. The tactical reload is accomplished by picking from your kit a fresh magazine, with the same hand taking the old magazine out off the gun, putting in the new magazine, taking the old mag back to the kit and finally racking the gun if necessary. The emergency reload is done by removing the spent magazine, letting it drop on the ground, picking up a new one from your kit, inserting it in the weapon and racking the gun if necessary.
The regular reload is also just called "reload". You may want to introduce into your kit a dump pouch, a large open pouch where you just toss in spent magazines so you don't have to struggle with quickly putting them back into your kit, but that isn't strictly necessary.
The tactical reload keeps your weapon down for less time than the regular if done correctly but needs some practice to be effective otherwise it's very probable that you'll just fail and drop the magazines on the ground, it took me 2 or 3 days to get good at it. It can also be called "reload of opportunity" as you usually do it when you have the opportunity. The specific instructions for the technique are hard to understand through text and even image or video format so I'll recommend you to check the drill section for the training app I'll recommend there as it has instructions with video. But if you want something in text, for pistols it basically consists of picking up the magazine as normal, transitioning that magazine to be held by your middle and index fingers, letting the old one fall into and be held by your index and thumb and finally inserting the new mag and pushing it inside utilizing the palm of your hand. Some people do it differently, I do it this way but may change it to another way if I decide it's better. Once again I recommend you do your own research. If done right the tac reload feels kind of like being a crab.
The emergency reload is usually done when the magazine has went empty in the middle of combat, your maximum priority is to get that weapon up again as fast as possible so it is a very fast reload. It's disadvantage is that contrary to the other two previous reloads you leave that magazine on the ground, as well as any ammunition left in it if it still had any. It may also be called "speed reload".
Now some tips that apply or partially apply to all of these reloads. For pistols pick up, insert into the weapon or back into your kit the magazines holding them with your thumb, index and middle fingers doing something akin to a pincer like shape with your hand, with the index at the front, thumb at the back and middle finger holding at the side of the magazine for support, the top of the mag to the outside and the underside of the mag to the hand's side. All your mags should be positioned on your kit in a way that let's you pick them up like this as it let's you easily put the mag into the weapon. Another tip is that modern pistols tend to have a feature that when they run dry the slide will lock to the rear, after you get rid off the old mag and put a fresh one in you will have two options. One option is to rack the slide back and let it fall into place. The other option is to simply press the slide lock button to let the slide fall back into place. I personally prefer to just use the button, but you could rack the slide if you want, however, do let the slide fall back on it's own, not doing so and instead holding it so it slowly falls back into place could result in a malfunction depending on factors like how clean your pistol is or what ammo you are using. On some airsoft pistols using the slide lock button could result in it wearing out due to things related to the materials used to construct the replica, if it does wear out the slide will no longer lock to the rear when out of ammo so in that case I recommend that you just rack the slide so the button isn't damaged. When reloading you want to keep situational awareness, this means that ideally you don't want to look down to reload, so take your pistol and bring it to the work zone and closer to your face while rotating it a bit, not in the center of your vision though, just a bit to the side, this helps line up the magwell with the path of the magazine and also let's you keep some vision and attention towards the target, this is more of a guideline however so if you're tapping your kit trying to find your magazine then actually look at it so you can reload faster instead of starring at your enemy. Last tip is that reloading quickly is nice but when inserting the magazine into the weapon I recommend that you slow down and maybe glance at the magwell as going full speed and not looking will probably result in you missing the magwell and dropping the magazine on the ground making it much slower than just slowing down a bit on that last section.
Malfunctions:
There are three main types of malfunctions you may find on a pistol. A failure to feed, a failure to fire and a failure to eject. These can occur on other types of firearms as well but we'll only be talking about pistols and once again you'll just have to adapt it to your particular firearm.
A failure to feed occurs when you or the pistol have failed to properly chamber a round. You can identify this malfunction by trying to fire a round but only hearing a click instead of a bang or nothing at all along with a usually soft mushy trigger if you have forgotten to even rack the slide. This malfunction can be solved giving a good tap on the magazine to make sure it's properly inserted into the weapon followed by racking the slide.
A failure to fire occurs when a round is chambered properly, the trigger mechanism works as it should but the round itself is a dud, usually a bad primer. It can be identified by once again hearing a click instead of a bang. It can be difficult to differentiate between a failure to feed and a failure to fire, fortunately for you the way of solving it is the same so it doesn't matter that much. Tap the mag and rack the slide, problem solved. It's said the two scariest sounds ever are a click when you should hear a bang and a bang when you should hear a click.
A failure to eject occurs when a round has been fired but the gun has failed to properly throw that round out to make way for a new round. You can identify it by the usually soft mushy trigger and by looking at the chamber and seeing that it's partially open, sometimes even able to see the stuck round in there. To solve it you'll want to lock the slide to the rear, remove the magazine, send the slide back forwards, reinsert the magazine and rack the slide.
A less talked about malfunction is a failure to eject the magazine when pressing the mag release button. This can be a critical problem when trying to reload in the middle of combat. You may not even be able to manually pull off the spent mag as you may have already grabbed a new one with your off hand. Fortunately for you this can also be easily solved by holding the mag release button and at the same time hitting the wrist of the pistol's hand into the inner elbow of your off hand arm, the impact should be enough to throw the spent mag away, from there continue the reload as normal. This can be called "chopping out" the magazine.
Inspection/four corner check:
Inspection or the four corner check is the action of looking and scanning around you to keep situational awareness. It can be done in time intervals, whenever you remember to do it or after some significant action, like moving from one position to another, reloading or ending a threat or group of threats, the idea being to avoid things like hyper focusing only on what's in front of you and end up getting shot or stabbed from behind. It is done by pointing your weapon down and using your knees, hips, torso and neck to turn all the way to one side so you can look behind you, you will then turn as slow as necessary to comprehend what you are seeing and go all the way to the other side, giving you a 360 degrees scan of your situation. Of course, in certain scenarios you won't be able to be slow and methodical, there you may opt to not look at all or look very quickly and just scan for any obvious silhouettes, simply accepting that you may not have seen something you needed to see. I personally do it from right to left but you can do it from left to right if you want, obviously if you have some indication that something may be coming from one side, like a sound for example, you should obviously begin with said side.
Doing it all while crouched:
All of this can be done while crouched with minimal adjustment, we'll only be talking about the crouching stances as the rest you can easily figure out by yourself.
The first crouching stance is a more usual one, it has a taller profile but much more stability. It can be achieved by bending both knees 90 degrees, one in front of your torso the other on the ground, back foot placed as you prefer. The legs are spaced as needed to keep your balance. The torso is kept upright unless you need to have a smaller profile for some reason, hiding behind a piece of cover for example.
The second crouching stance is the low crouch from the blogpost about crouched movement. It's less stable of a platform to shoot but since that is the idle crouched position that you may spend quite a lot of time on you may have to shoot from it at some point. Put your feet at a fighting stance but without spacing them out more than normal and lower yourself until you are sitting on the heel of the back foot, no need to lower your back too much so as to not curve your spine too much. Your hands are kept free.
Drills:
Now for some drills to train all of these skills. Typically the more focused you are on a certain task the faster you will get better at that particular thing. For example, instead of training a whole draw you may want to do some repetitions of simply getting a good grip on your pistol from your holster, then some more repetitions of getting the pistol out of the holster, then some of bringing the pistol to the work zone and getting a two handed grip, that sort of stuff, segmentation of a drill. The problem with that is it tends to become boring rather quickly and because of that it loses it's advantage of focus, so you may want to do some longer stuff as well even if you are just beginning. I will only be giving the instructions for whole drills, if you want to segment their steps feel free to do so. You may also wonder "Should I go for precision or speed?" And well, ideally you should go for both as it doesn't matter if you can unholster and fire your weapon in 0.001 seconds if all your shots miss the target and it also doesn't matter if you can hit the target exactly where you want if it takes 30 seconds to do that. But at the beginning be as slow as necessary and with time and practice you will be able to perform correctly at higher speeds. If you do speed it up and mistakes become a pattern slow down again and correct those mistakes, then try to speed it up again. All drills are to be practiced with proper stance unless stated the contrary. Remember to mark the hits in some way so you don't confuse them with new hits in the future, I used a green sharpie for this and marked the hits with a circle around them. If your training gun has misaligned sights that you know are misaligned because you've got someone who knows how to shoot to test it and got the same results I recommend you to continue aiming the training gun as if that wasn't a problem and when the time comes to check hits you just mentally correct where the impacts would have been if it were not for the crooked sights, you must do this because you don't want to ingrain into your mind to always aim a bit to the sides as when you pick a real gun that instinct will still be there and cause you to miss.
The first drill you should do is simple target shooting so you can train sight alignment and trigger control. Simply load your magazine, form a two handed grip, align your sights with your eye and target and pull the trigger without disturbing the sights. Stop every five rounds or so to check your hits on target and make sure you're not committing some mistake. You can begin with the target at 3 meters and get to longer distances as you improve, this applies to other drills as well so it won't be repeated. If you can't have the target be further away then you could try making the target smaller. Do only this for the first and second day, it gets a bit boring but it really helps you improve. Don't get discouraged if you struggle at first, that is normal. I myself began by taking 10 seconds to properly line up a shot.
The second drill is the short target acquisition drill. Bring your pistol to the aiming line, the imaginary line between your eye and the target, and tilt the pistol's barrel 30 degrees to one of four directions, either up, down, left or right, your objective is to align the sights with the target, fire one round and revert back to the tilted barrel position so you can do it again. Pick a direction and do at least 10 repetitions on that tilt so you can build muscle memory. Remember to keep your finger off the trigger when not in the process of aligning the sights with the target, specially when the barrel is pointed upwards.
The third drill you should train is the longer target acquisition drill. Get into stance and from low or high ready bring the sights to be aligned with your eye and target and fire one round, then revert back to the initial position so you can do it again. Again, as an end goal you should be able to do this really quickly but at the beginning go as slow as necessary.
The fourth drill is the draw drill. You will begin either in stance or out of stance and try to get onto stance when the drill begins, though I recommend doing the latter only after doing the former a few times. You will unholster your weapon, form a two handed grip, bring the pistol up lining the sights with your eye and target and fire a shot, after that you will re holster your weapon so you can do the drill again.
The fifth drill is the recoil drill. The drill begins with the weapon at the aiming line. You will aim at the target and fire a short burst of 4 to 6 shots, from there end the drill, go mark your hits and return to the initial position to do the drill again if desired. Your objective is to control the recoil and get acceptable hits on target. This drill really shows if you are gripping your gun effectively as if you are not it is likely you will see your grip dissolve, something you don't get with the other drills where you will be mostly kept at a slow rate of fire.
The sixth drill is the reload drill. The drill begins with the weapon at the aiming line. You will bring the pistol to the work zone, perform whatever reload you wish to train and bring the pistol back to the aiming line. This drill is to be performed without ammo as it doesn't involve shooting. Additionally, I recommend doing this on top of some soft surface as you may unintentionally drop the magazine on the ground or intentionally drop it in the case of the emergency reload, enough drops and that mag will break, I'd say you can even do this drill sitting on your bed with a pillow on your lap as the big focus of this drill is on your hands and eyes instead of anywhere else on the body. I personally give the most attention to the tactical reload as it is the hardest to do but with more benefits than the regular and also because I can't afford to leave magazines behind, also the emergency reload has the same critical steps so in a way you are training for it as well.
The seventh drill is the inspection/four corner check drill. You begin at high or low ready, sight in your weapon and fire a shot at the target, after that bring and point your weapon down and perform an inspection, from there end the drill or reengage the target to do the drill again. Additionally, after becoming proficient at the other drills you may want to introduce the inspection at the end of them as well to further ingrain it into your brain so you never forget to do it.
The eighth drill is the big drill. It's a combination of all previous drills, it hasn't got much focus on anything but it is very fun so it can be done at a huge scale, I can do it for hours just because I really like doing it. Draw your weapon, form a two handed grip, bring it to alignment, fire one round at the target, reload, bring it back to alignment, fire another round, perform an inspection, put your weapon back in the holster and go verify the hits on target, go back to the initial position if you want to repeat it. Again, it is inefficient in the sense that you don't put most of your focus on learning a single thing but because you can do it a hundred times in a day you do still end up learning a lot.
The ninth drill is the target transition drill. You begin at high or low ready, aim and fire one round at the first target then immediately aim and fire another one at the second target, from there end the drill or reengage the first target to continue the drill until you are satisfied or out of ammo in your magazine, do one drill with your body pointed at the target to the left, one to the right and one between them, you can also do two shots per target if you want. You can begin with the targets right beside each other and slowly space them apart as you get better or you could just begin with them spaced by 45 degrees on some sessions and 90 degrees on other sessions, whichever you prefer.
The tenth drill is the color target transition drill. You will use a target with four colors, could be numbers or symbols as well. Begin at high or low ready, think of a sequence, for example, green then yellow, or blue then red then yellow then blue again, whatever you can think of that you are capable of remembering, you can also do things like two shots per color, then engage the targets in that sequence, after that end the drill, repeat as desired. Alternatively you could look up "soccer awareness colors" on YouTube, pick some video you think will work, find a way to leave your phone close enough to the center of your vision so that you can see the colors changing and engage the colors as they appear until you run out of ammo on your magazine, use the video speed function to make it easier or harder to keep up. I didn't really like this drill that much as I only thought of it when I had already gotten pretty good at target transitions so I thought it was too easy, but I think it could be pretty interesting at the beginning or as a final test to see if you have really gotten good.
For malfunctions, during all these drills and training you will inevitably run into them, solve the malfunction and carry on with the normal drill. You should do a few minutes of doing the process of solving them for training specifically for malfunctions as well.
Additionally I recommend that after you have done and gotten good at those basic drills check out the Drill app, it has a lot of cool basic drills, in fact some of the drills presented here come from there.
Here are the links for it:
https://play.google.com/store/apps/deta ... =web_share
https://appdrills.com/
A important note is that for some reason some drills say they require way more equipment than they actually require, I suspect it's because some content isn't implemented yet but for now you should be able to get by with a gun, two magazines, ammo, a holster and a target, sometimes two. Another important note is that you only have access to dry fire drills without a subscription, they can't stop you from using those drills in a live fire capacity however so fire away! Other than that follow their instructions and have fun!
Another good source of drills to check out is the T.Rex Arms website.
Here's the link:
https://www.trex-arms.com/training-targ ... l5jWkblg.1
They also have many other training resources that I recommend checking out, mostly in video format. Once again follow their instructions and have fun.
Let's talk about targets, specifically how to make them in case you don't want or know where to buy them.
By far the easiest and most practical design I've found is simply taking a cardboard box, preferably a thin one the sort that gets used to package televisions, and simply taping a paper target to it. The box will get holes into it but the holes will mostly be in the same area so it won't affect it's structural stability meaning the only thing you have to replace is the paper target you tape to it. You should replace the paper target when it becomes hard to distinguish new hits from old hits. You can acquire a box by going to some store or super market and asking to buy the ones that came packaging their products. Additionally, if using it for airsoft you might want to consider putting an old pillow inside as that will stop the BBs from coming out the other side, they may be plastic but with enough hits they will make a hole in your wall, I say this as someone with two new holes on my wall. Woops.
As for the paper target, for the purposes of learning basic shooting I recommend using a simple bullseye target instead of some silhouette target, you can just look them up on the internet, download a high definition one you like and print them. If you don't have a printer I recommend getting a red sharpie and drawing a cross on the paper, make it as thick as necessary for you to see it at the distance you are shooting.
This setup by itself will be as tall as your knees, you want to bring it up to the height of the average person, to do that if at your own property and not a public range simply stack objects on top of each other and put the target on top of it all.
Of course, you could also make a more professional looking thing out of wood, but if you can think of that then I probably don't need to tell you how to do it.
Now let's talk in a simplified way about ballistics, more specifically the material penetration portion of ballistics.
We don't have the time to go over how every cartridge behaves in relation to different levels of armor but I can tell you factors that help or hinder in the penetration of materials and you can use that information to recognize cartridges with good capability yourself. The following is presented in no particular order.
Things that help with piercing armor are:
Projectile velocity. A .45 round is very slow when compared to a 5.7 round for example, this is a major contributor for why .45 really struggles with penetrating armor.
Hardness. A projectile made of lead or copper is soft when compared to a projectile with a steel core penetrator, that is, a projectile with a chunk of steel inside, that along with other factors make the steel core round much better for penetrating armor.
Density and weight. Another attribute that helps a steel core penetrator projectile is that steel is a much denser material than copper. In case you don't know what density is basically the denser a material is the less space it occupies to reach a given amount of weight, a kilogram of feathers occupies much more space than a kilogram of steel. This means that the steel penetrator projectile gives a "stronger punch" than a copper projectile while still concentrating all that power on the same small area. Lead is denser than steel but again, it is softer so more prone to deforming on impact without doing much damage.
For materials like drywall, wood and bricks are similar to body armor but slightly different as certain values are more important in that case. For example both being common rounds without steel core penetrators a 7.62x51 cartridge will struggle more against body armor than a 5.56x45 because it is slower but will be much better at destroying bricks than the 5.56 because it is heavier. Other factors are also involved but I want to keep it simple as this isn't much of an explanation but more of an addendum to inform that factors are not the same for body armor and more common materials.
Things that hinder penetration are:
Angle of impact. Hitting armor or a wall head on has better chances of piercing it than hitting it at an angle as angling helps deflect the projectile.
Distance. Hitting armor or a wall at 5 meters is not the same as hitting it at 500 meters as the more distance a projectile travels the more it looses it's energy due to factors like wind resistance.
Previous layers. If a projectile that is rated to pierce a certain level of armor has already traveled through a wall it may have lost enough of it's energy to not be able to pierce that armor any longer.
Projectile shape. Typically a hollow point projectile will struggle more with penetrating materials when compared to FMJ as it is designed to transfer it's energy and stop inside the target. In layman's terms if the bullet is pointy it can probably go through more stuff than a non pointy bullet of the same caliber.
Now let's talk about fighting people with body armor. When you pull a gun on a person in self defense you don't necessarily have to kill that person, you probably will, but your intent is generally to make that person not a threat anymore by whatever means necessary. A person ceasing to be a threat can end in one of two ways, a psychological stop or a physical stop. A psychological stop happens when the person surrenders or runs away, either immediately upon seeing the weapon or after having some wound and pain inflicted upon them. A physical stop happens when the person becomes incapable of being a threat, because it's brain exploded, it bled out to the point of unconsciousness or it became incapable of stabbing or pulling a trigger. Generally speaking a physical stop is much more reliable than a psychological stop. Armor is a problem because it makes it very hard to hit where you have great chances of reaching a physical stop, among other complications this makes it so that the threat may have some extra time to fight back, possibly by shooting at you.
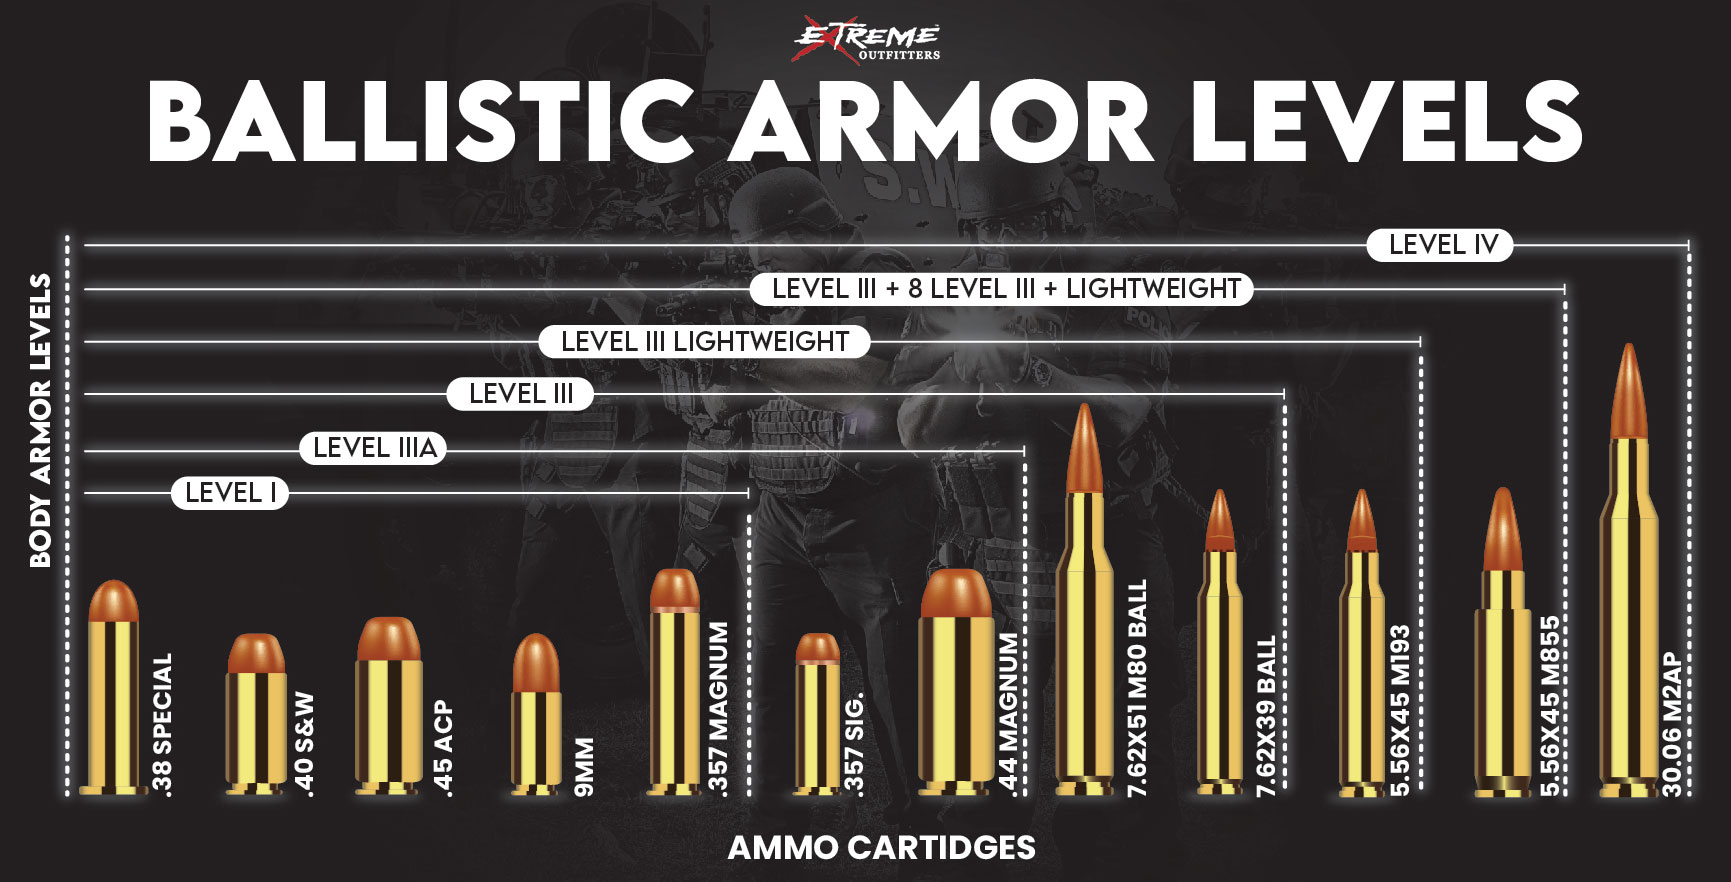
Typically most ballistic helmets and soft armor are level 3A, that means they will stop all the most common handgun calibers provided it's not some special armor piercing ammo of course. Then you have plate armor, they will usually be at least 3A but can go higher and stop most rifle rounds including 5.56 green tip, a 5.56 round with a steel core penetrator. There are more factors to hitting armor than just penetration. There's backface deformation, the armor stops the projectile but it's energy is enough to push the armor towards the wearer and break his ribs or skull. There's the energy transfer, the armor stops the projectile but the force applied to the wearer's head is enough to knock him out for some time. These factors exist but relying on them is pretty much trusting random chance. The enemy may be knocked out because he got shot in the back of his helmet or maybe he won't. The enemy may disengage from getting his ribs broken or he may not even notice he got shot because the adrenaline made him not feel any pain. Overall I'd just recommend not shooting at armor and instead aim for something else.
If you are using a gun that fires handgun calibers it's best to assume you can't get through any armor. If using a rifle you can assume you can get through soft armor but plates are up to question, also some vests allow the user to use soft or plate armor so there's even more doubt. Some knowledge and intel on your opposing force might help with that, for example usually average street policemen use soft 3A armor while the SWAT units use rifle rated plates, sometimes even rifle rated helmets that aren't really comfortable due to being too heavy but that's not a problem for them since they'll just wear it for a one hour raid. Regardless, here are some basic and brief instructions on what to do if fighting people with armor you can't pierce.
If the enemy is wearing just a vest aim for his head, more specifically the center upper half of his head where the brain lies, a hit to the brain stem will instantly take someone out.
If an enemy is wearing just a helmet aim for center mass, put as many shots there as is necessary to make him not a threat anymore. The heart is a bit above the nipple line and close to his center vertical line but a slight bit to the side. It's not instant death but it's as fast as you can get without being able to target the head.
If an enemy is wearing a helmet and vest you could try to hit his neck bone as there is a significant chance damage to that will result in immediate paralysis, it's a small target so good luck though. Another target would be the pelvis to try damage his mobility so you can run away and disengage or try to flank him, legs could have a similar effect. A hit to the arm or shoulder could make him unable to pull the trigger because of damage to the muscles and tendons.
A gunfight is very fast and dynamic, you'll probably not be able to execute your perfect plan to neutralize the target as fast as possible and will have to just wing it, but now you at least know some alternatives that are likely better than hitting armor and doing little to no damage.
You could also just try to mag dump on the armor as well, those things aren't magical and do have limits on how many rounds they can stop, but again not very reliable.
Now I'd like to address certain concerns and sometimes outright disdain and snobbishness some people in the firearms community feel towards things like airsoft despite quite a lot of knowledgeable and influential people in the firearms community having already stated favorable opinions towards it as one can see in the source section. But I'd still like to give my own take on it despite knowing that I have very little chance of success in convincing those people if they weren't already convinced by people with way more authority than me.
Certain people claim airsoft is unrealistic, that you can't learn anything good from it, that it's merely toys that serve no practical purpose, that it's LARPing and cringe, some don't even state a reason and just seem to hate it without explanation, all of this despite airsoft actively being used for training by police and military.
Let's say you are the best case scenario. You live in the United States where guns and ammunition are relatively cheap and easily accessible, you have your own select group of friends that can all regularly get together at your own private compound to train and spend thousands of live rounds, you all also have training conversion kits for your guns and training ammo to do force on force training on a controlled environment. Cool. That is very nice. However, the vast majority of people are not in that situation. The vast majority of people do not live in the US, they do not have a group of friends who all like guns and training, do not have their own dedicated place for training, can't spend the price of a brand new car on ammunition to do thousands of repetitions of drills, they can't even buy conversion kits and training ammo to use on their real guns, hell maybe they can't even own a real gun right now for whatever reason.
What most people can easily do however is buy an airsoft gun, buy thousands of BBs so they can do thousands of repetitions of drills on their own home, go out to some airsoft field and meet with randoms to practice force on force, maybe even become friends with some of these randoms and do more in depth training with them. If they can't own a gun right now in the future when they do get one they already have some training. Alternatives for training that aren't real guns may not be the most ideal, realistic and perfect solution but they are something and something is better than nothing, sometimes that's all some people can get at the moment so please, don't be a gatekeeping elitist.
A major reason for the existence of this guide is to provide solutions for people who want to get better at the use of firearms but aren't on an ideal position for that and may need to improvise.
With that being said, a lot of training value you get out of things like airsoft depend on how much of a focus on training you put into it in the first place. If you are running your actual kit that you would actually use and doing only things you would actually do on a real scenario then you will learn a lot. Conversely if you are running a speedsofting kit and running around trying to dodge bullets, treating it more as a fun game than a training and learning opportunity then you will obviously not learn a lot.
Try to keep in mind the inherent inaccuracies and limitations of the simulation you are using to train that you will inevitably encounter and probably have to partake in so as to not be too limited, just say to yourself "I would not be able to do this in real life" and carry on, it is what it is. You may hide behind a bush because that's enough to stop BBs, you may cross an open field because your enemies are 200 meters away and their BBs can't reach you, you may brush off a grenade because you were 6 meters away instead of 5, just keep in mind that in reality bushes are only concealment, rifles can easily make 200 meter shots and grenades can throw lethal fragments to a range way beyond the five meters your local field says it counts.
Maybe try to implement things you've learned here or somewhere else, for example consider what replica you are using and what body armor that would be able to pierce in reality, then try to only hit unarmored areas if you can't pierce a particular enemy's armor. That might make things harder for you but again, you get the training value at the rate you put in focus on training. Another thing you can sometimes see in things like airsoft is people using kits from the past. I'd say that has some potential for learning as it's pretty much a peek at previous conflicts that could give you some insight that could be applied to your more modern kit, just keep in mind that the money you spend on getting a perfect world war one kit may have been better spent on other stuff.
Generally as the fields and engagement distances expand you lose accuracy and realism in terms of direct combat but you do end up being able to practice other interesting skills like land navigation, coordination, ambushes and even stealth and infiltration since your opponents won't always be expecting contact. Smaller fields more realistic combat, larger fields more freedom of action.
Now some very basic and general combat tips.
Know the difference between cover and concealment. Cover provides protection from getting shot and generally hides you from view. Concealment only hides you from view. A thick tree is cover, a bush is concealment. A car's front where the engine is is cover, a car's door is concealment. A brick wall is cover, a wooden door or table is concealment. Bullet proof glass is cover, regular glass with a dark film is concealment. Also remember that cover is relative and what stops a pistol may not stop a rifle or a .50 cal and act according to what you are fighting against. Another thing is that cover degrades, even the sturdiest brick wall will break after enough damage.
Don't stand in the open where you are an easy target, get to cover or at the very least concealment, if none of that is available try to make yourself smaller by going prone. Obviously if the threat is right in front of you, the cover way behind you and it makes more sense to just shoot instead of running for cover or going prone then this tip doesn't apply.
When in cover avoid getting right up against it or having your back facing it, prefer to stay at least about an arms length away from it so you keep situational awareness by not having everything you see be wall and don't face away from the threat.
When popping out of cover to shoot back try to expose as little of you as possible. Avoid popping out from the top as that exposes you to way too many angles at once, give preference to popping out from the sides. When popping out from the side avoid always popping out of the same side as your enemy may be looking there and waiting for you to pop out, if there is nowhere else available to pop out try to change your height by crouching or retreat to another piece of cover.
If you need to reload or solve a malfunction then obviously get back into cover.
This is dependent of situation but if applicable avoid staying on the same piece of cover for too long as you might get flanked.
Try to avoid moving without your gun being ready to fire, as in no ammo, jammed or not in your hand, as if danger suddenly appears you may not be able to respond. Of course if you are in immediate danger and need to move then obviously move. This and other tips are more like guidelines to be applied and adapted depending on context.
Keep situational awareness and avoid hyper focusing if you're not with a team that is covering your flanks for you.
Try to keep calm and not panic, you probably won't be able to but at least try. Having previous exposure to stress may help.
Understand and accept that you may possibly, maybe probably get shot and killed. It is what it is.
Sources:
On dry firing:
https://youtu.be/YOc0K-nIESk
https://youtu.be/lYJk_ioERK8
https://youtu.be/1OwCjuUNs0M
https://youtu.be/-6uHjvTsMNc
On guns:
https://youtu.be/hJdv5uTtFJ8
On safety:
https://www.headphonesty.com/2023/06/no ... -shooting/
The Drill app.
On training:
https://youtu.be/DV_WTsF_7kM
https://youtu.be/CDB8sDwwWwU
https://youtu.be/BypuKXOmEkg
https://www.youtube.com/playlist?list=P ... nMGXi56TQl
https://www.youtube.com/playlist?list=P ... B9Lt341HH-
https://youtu.be/6lMYzJpD4n8
https://youtu.be/YS6Vk2vPuYA
https://youtu.be/f7PVB-PF0iE
https://youtu.be/OeC5ye6DtdI
https://youtu.be/bElcXjJ5iII
The Drill app.
On ballistics:
https://youtu.be/j3BlRPtCj2E
https://youtu.be/7VeqqNuQU_4
https://youtu.be/-4Qi_Fr9Bbg
https://youtu.be/eF29mvSmbWM
https://youtu.be/ia1k1Zg4l2A
https://youtu.be/6JwlzR5nPFw
https://youtu.be/4qSVOZfp3R4
https://youtu.be/urWDf8DoI3M
https://youtu.be/d9Og2YeSGVY
https://youtu.be/bKQizbg1zBw
https://youtu.be/SwDoWSkiGZ4
https://youtu.be/i0x-aFVMcko
https://youtu.be/3vhjP1WKD-k
On anatomy:
https://youtu.be/uWR3LHEjRAE
https://youtu.be/T85RSuPeQoA
https://youtu.be/r-PrC_OsfJQ
https://youtu.be/AIULDPGDolQ
On airsoft:
https://youtu.be/qQDfwyUgtjg
https://youtu.be/a1y8ENfbaig
https://youtu.be/Chtb6bvNcxc
https://youtu.be/ECGxVlh4kFY
https://youtu.be/CnF5ui73Osg
https://youtu.be/Z_N3Zf5CnVQ
https://youtu.be/dKcdz-pxF7I
https://youtu.be/kx9dkCAHZyM
https://www.reddit.com/r/airsoft/commen ... th_airsoft
On combat:
https://youtu.be/Us-w6569cm8
https://youtu.be/K0SjIC1gYTA
https://youtu.be/vIJJCSs0SP8
https://youtu.be/DlNHy40LqzE
https://youtu.be/RARNJwzKmps
https://youtu.be/ofwUAkcpzDY
https://youtu.be/XavAanwtoww
https://youtu.be/tCq7pEtSIV4
https://youtu.be/pGs_2eYGyw8
Man this took a very long time to write, ignoring various setbacks like the airsoft gun breaking and having to take it to a repairman actual training time took only 5 weeks, hours per day varying a lot, from one hour all the way to 8. I'd say it was time extremely well spent since in this relatively short time I went from really bad to good.
If I have forgotten the source for something feel free to say and if it isn't something that I have forgotten where I've learned it from I'll edit the post to add it.
Next up I'll probably do crouched wall movement, not right now though, right now I want to take a break from writing not this wall, but an entire skyscraper of text, probably a week or two. As for combat related stuff I'll probably do shooting while moving next.
End of blogpost.


